

Two way communication between Angular components and Unity WebGL build
Following on from the blog post back in June where I talked about optimising and hosting Unity WebGL builds in Angular & ASP .NET Core I thought a good follow up for that would be to show how to do two way communication between Unity and Angular.
Precursor
If you haven’t done so already, head on over to Part 1 of the tutorial as I’ll be building on that code in this quick tutorial: Part 1 - Unity WebGL builds in Angular & ASP .NET Core.
This tutorial also assumes you have an understanding of Mechanim in Unity and so we’ll breeze over some of the details whilst focusing on two way communications. If you don’t know about animations, don’t worry too much, the concepts of two way communications are the same without that piece of domain knowledge.
If you’re more of a visual kinda person then follow along with the video below:
Source files & example
TLDR: The source code is available on GitHub
You can view the application in action here.

The scene
We’ll be building a simple Unity scene where we can view the current animation in the Angular component and send commands to the Unity game instance from the Angular component
The Unity build overview
I’m not going to go into the unity build in great detail other than to cover the parts we need to understand for our build. Let’s start with the AnimatorController for our character.
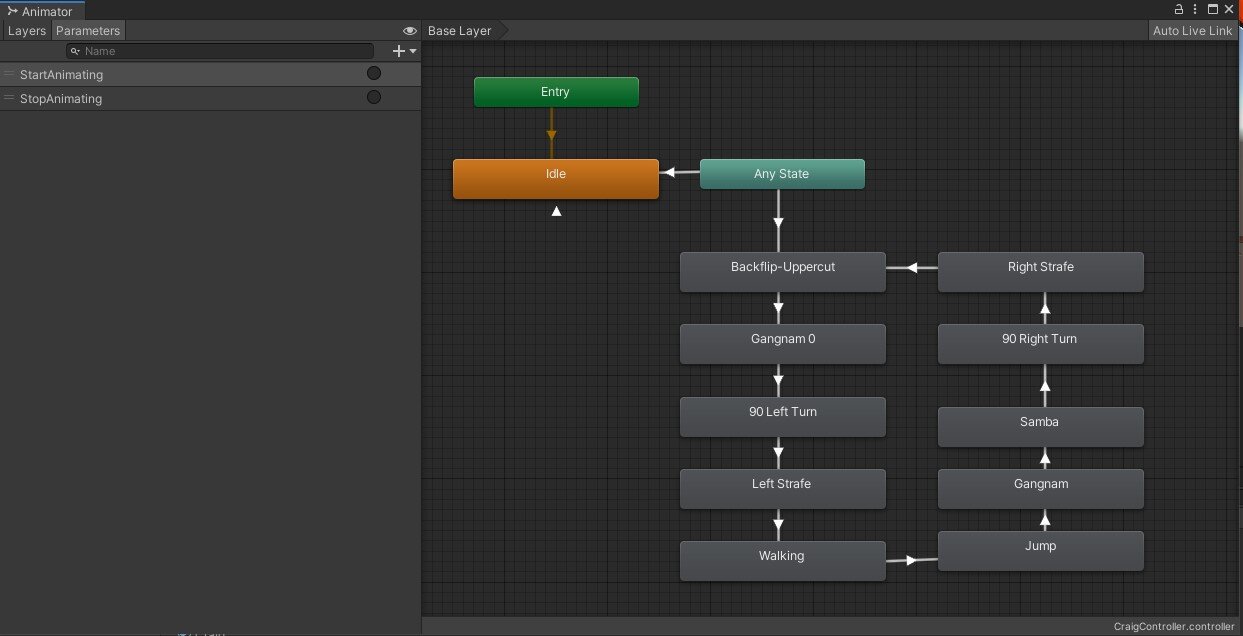
We have a simple AnimatorController with two triggers:
StartAnimating
StopAnimating
These triggers are conditions for the transitions between the Any State and Idle (StopAnimating) or between the Any State and the first animation in a series of animations (StartAnimating).
I’ve downloaded, Douglas, one of the default models from Mixamo and some of the default animations from there too for the sake of this tutorial.
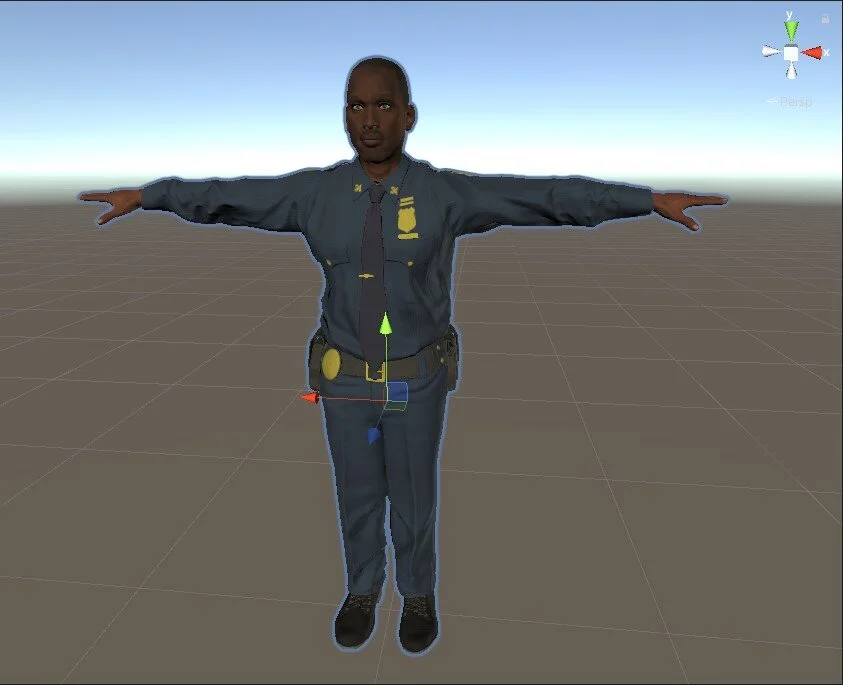
Say hello to Douglas
Part 1 - Receiving messages from Unity WebGL in Angular components
First up we need to be able to receive information from Unity in Angular. To do this we need to be able to send messages from our C# Unity scripts to Javascript. The latest and greatest way of doing this in Unity is to create a file with the extension .jslib in the Plugins folder of the assets directory.
In these files you can include Javascript methods which you will be able to call from your Unity scripts. Our file is named BrowserInteractions.jslib and looks like the following:
mergeInto(LibraryManager.library, {
  AnimationStateChange: function (str) {
    if (window.animationChangeListener) {
        window.animationChangeListener(Pointer_stringify(str));
    }
  }
});
Here we declare a method named AnimationStateChange with a single parameter named string. Within our method we check to see if the window element in the DOM has a function called animationChangeListener and if it does we get the original string passed to the method by using the pointer-to-string helper method named Pointer_stringify and we call the method on the DOM.
Now in order to send calls to the Javascript method we need to import it into our MonoBehaviour scripts as follows:
[DllImport("__Internal")]
private static extern void AnimationStateChange(string str);
By using the DllImport attribute with the DLL name of __Internal we pull in any methods mentioned in any .jslib file in the Plugins folder. In our code we utilise this method by adding a script to our Douglas character which calls the method every time the animation clip name changes allowing us to export it in Angular. The full script is as follows:
public class AnimatorEvents : MonoBehaviour
{
    [DllImport("__Internal")]
    private static extern void AnimationStateChange(string str);

    [SerializeField]
    private Animator animator;
    private string currentClipName;

    public Animator Animator { get => animator; set => animator = value; }

    private void Update()
    {
        var activeAnimation = Animator?.GetCurrentAnimatorClipInfo(0).FirstOrDefault();

        if (activeAnimation?.clip?.name != currentClipName)
        {
            currentClipName = activeAnimation?.clip?.name;
            Debug.Log($"Animation changed: ");
            AnimationStateChange(currentClipName);
        }
    }
}
Getting the Unity generated values in Angular
In the previous tutorial we build a UnityComponent in which we adapted the UnityLoader.js file slightly to play nicely with mobile and we loaded the game instance from the asset directory inside an Angular component which meant we were free to just add a <unity> element on the page wherever we needed the build to be displayed.
Since all of that logic is handled, we simply need to add the animationChangeListener method to the window element of the DOM as is expected in our jslib file we created earlier.
In a new component we add this method in our ngOnInit() method and set a local property with the value that’s passed to us.
import { Component, OnInit, ViewChild } from '@angular/core';
import { UnityComponent } from '../unity/unity.component';

@Component({
  selector: 'app-part2',
  templateUrl: './part2.component.html',
  styleUrls: ['./part2.component.css']
})
export class Part2Component implements OnInit {
  animationName = "Unknown";

  ngOnInit() {
    (window as any).animationChangeListener = (animationName: string) => {
      this.animationName = animationName;
    }
  }
}
In our component markup we can now display the animation value provided we have a <unity> element available on the page as follows:
<p>Current animation: <span class="badge badge-primary">{{animationName}}</span></p>
<unity></unity>
Now we have one way binding of data from Unity scripts to Angular. The other way is even simpler.
Part 2 - Sending messages to Unity from Angular
I won’t break down the Unity code in this tutorial other than to say that in our scene we have an object named Director which has three methods from a script named SceneControl.cs which we need to be able to call from Angular. These methods are as follows:
StartStopAnimation() - this method fires the triggers on the AnimatorController we mentioned earlier to start Douglas’s animation routine or set him back to idle if he’s already animating.
StartStopRotating() - this method either sets the camera back to be facing Douglas if the camera is rotating or starts rotating if the camera is stationary.
SetDistance(float distance) - this method sets the distance of the camera from Douglas in metres.
Fortunately for us, Unity provides a method on the game instance object loaded by the UnityLoader.js named SendMessage() with two overloads:
SendMessage(objectName, methodName) - Calls the function on a named object in the current scene.
SendMessage(objectName, methodName, parameter) - calls the function on a named object in the current scene passing parameters.
In part 1 of this tutorial we use the UnityLoader script to create a local named object named gameInstance in our Unity component. In order call our methods on the Director object in our unity scene we simply need to add three new methods to our unity.component.ts file as follows:
 startStopRotating() {
   this.gameInstance.SendMessage('Director', 'StartStopRotating');
 }

 startStopAnimation() {
   this.gameInstance.SendMessage('Director', 'StartStopAnimation');
 }

 setDistance(distance: number) {
   this.gameInstance.SendMessage('Director', 'SetDistance', distance);
 }
Now since our Unity component is a child of our Part 2 Component we need to add a view child to allow us to configure buttons in the component which pipe through commands to our unity component. First we need to add a name attribute to our unity element as follows in part2.component.html:
<unity #unity></unity>
Then in our part2.component.ts we need a viewchild property to refer to this DOM component and methods for our own component buttons as follows:
@ViewChild('unity', { static: true }) unity: UnityComponent;

startStopAnimation(): void {
  this.unity.startStopAnimation();
}

startStopCameraLoop(): void {
  this.unity.startStopRotating();
}

setCameraDistance(distance: number): void {
  this.unity.setDistance(distance);
}
Now finally we need some buttons to call those functions as follows:
<div class="form-group"> <label>Animation control:</label> <button type="button" class="btn-primary btn" (click)="startStopAnimation()">Start⁄stop animation</button> </div> <div class="form-group"> <label>Camera control:</label> <button type="button" class="btn-primary btn" (click)="startStopCameraLoop()">Start⁄stop camera rotation</button> </div> <div class="form-group"> <label>Camera distance:</label> <div class="btn-group" role="group"> <button type="button" (click)="setCameraDistance(1)" class="btn btn-primary">1m</button> <button type="button" (click)="setCameraDistance(5)" class="btn btn-primary">5m</button> <button type="button" (click)="setCameraDistance(10)" class="btn btn-primary">10m</button> <button type="button" (click)="setCameraDistance(20)" class="btn btn-primary">20m</button> </div> </div>
Now we’re done. It’s as simple as that.
I’ve skirted over a lot of the detail in the written part of this tutorial. I recommend you take a look through the repo on GitHub and also watch the video so you can see the full code in action.
If there are any other topics you think I should cover then hit me up on Twitter!


